Showing posts with label recipes. Show all posts
Showing posts with label recipes. Show all posts
Tuesday, July 30, 2013
Korean Short Ribs (Kalbi) Recipe
This is a great dish to prepare for a pot-luck BBQ. It cooks quickly so you can serve a lot of people and everybody loves it so much, there's never any left to take back home. Getting the beef is pretty easy at Asian supermarkets where you often find them pre-cut on styrofoam trays. If you can't find an asian market, just ask your butcher to cut up some up for you. Most likely, they will understand what you mean if you tell them you want Korean short ribs.
Ingredients:
5 lbs beef short ribs, cut across the bone to 1/4" thick slices
Marinade:
1/2 cup soy sauce
1/4 cup rice wine (sake)
1/2 cup sugar
1/4 cup sesame seed oil
a big squeeze of honey (roughly 3 tbsp)
a couple dashes of chili oil to taste
6 cloves of garlic, finely minced
4 bunches of green onions finely sliced
1/4 cup toasted sesame seeds
Directions:
Mix the marinade ingredients together in a large bowl. Ensure the sugar is completely dissolved.
Dip the ribs into the marinade to evenly coat and place into a 1 gallon zip lock bag. Press as much air out as possible before sealing.
Place the bag in a leak proof tray and into the fridge overnight to a day, flipping it once half way through.
To cook, grill each side at medium to high heat, about 2-4 minutes. Use a water bottle sprayer to extinguish any flareups. The goal is to get the fat to melt from the meat and let it fry itself on the grill without letting the fat cause too many flareups.
Wednesday, May 15, 2013
Japanese Style White Bread (Part 4)
After several iterations, I think we've settled on a recipe. This one is nice because we can do everything in the bread machine. However we have to add the more expensive vital wheat gluten to boost the gluten development.
Ingredients:
170g milk
1 Tbsp + 1 tsp vital wheat gluten (4 tsp)
271g bread flour
1 1/2 Tbsp sugar
1 tsp salt
1 tsp yeast
2 1/3 Tbsp butter cut into small pieces
Directions:
Add all ingredients to your bread machine bowl in the order provided. This order is important. Adding the vital wheat to the milk first maximizes the gluten development via autolyse. Try to sprinkle the sugar and salt in a ring evenly around the edgest of the mound of flour. Before adding yeast, make a little crater in the mound of dry ingredients and add the yeast into it. Collapse the sides of the crater in to cover the yeast with flour. Then evenly distribute the butter over the top of the mound. These steps ensure we get even distribution of ingredients which leads to a nice consistent texture of the bread.
Thursday, April 11, 2013
Japanese Style White Bread
After seeing how much my wife was spending on "premium white" bread from Anderson Bakery ($7/loaf), I decided it was time to start making it at home. After all, my wife was the one who insisted we get a bread machine years ago because we were spending so much at the bakery. As I predicted, after a couple of tries, she eventually found it too much work and never quite made the same type of bread she was used to, never using the machine again. I figured, that I had to put our bread machine investment to work and come up with an easy "premium white" recipe that we can make in the machine.
Here is a recipe I found
https://cornercafe.wordpress.com/2009/03/14/japanese-style-white-bread-loaf/
The secret here is the water-roux paste which supposedly gelatinizes the starch in the flour allowing more liquid to be absorbed into the bread.
This is my adaptation for use in a bread machine. The first step is creating the roux paste since you'll want that to cool down while prepping the other ingredients.
Results?
I have to say that my 1+ yr old yeast isn't good anymore, so the first loaf turned out pretty dense. I'll have to try this again with some fresh yeast.
h
Here is a recipe I found
https://cornercafe.wordpress.com/2009/03/14/japanese-style-white-bread-loaf/
The secret here is the water-roux paste which supposedly gelatinizes the starch in the flour allowing more liquid to be absorbed into the bread.
This is my adaptation for use in a bread machine. The first step is creating the roux paste since you'll want that to cool down while prepping the other ingredients.
| Water-Roux Paste: | |
| 20g bread flour 100ml water |
Mix flour and water in a small saucepan. Cook over low to medium heat, stirring continuously until it reaches 65ºC. It should have thickened to a paste at this stage, that is when you stir you can see the bottom of the pan. Remove from heat, place a cling wrap over the paste and leave until lukewarm, or room temperature, before using. (Alternatively if you don’t have a thermometer, cook as before until it just starts to thicken, then continue to cook for about 1 more minute before removing from heat.) This water roux can be kept in an airtight container after cooling in the refrigerator for 1 day if not used immediately. However DO NOT USE if it turns grey in colour, that means it has gone bad. |
| For the Bread Dough: | |
| 150ml lukewarm water 30g butter, cubed Water-Roux Paste (see above) 1 Tbsp milk powder 350g bread flour 30g sugar 5g (1 tsp) salt 7g (2.5 tsp) instant dry yeast |
Add all the ingredients to your bread machine in the order provided. As always, its best to make a little crater in the mound of flour and drop your yeast in there. Then set your machine to the white bread setting and start it. |
Results?
I have to say that my 1+ yr old yeast isn't good anymore, so the first loaf turned out pretty dense. I'll have to try this again with some fresh yeast.
h
Friday, July 09, 2010
Homemade Hashbrowns

Ingredients:
2 Medium Russet Potatos
Vegetable Oil
Salt and Pepper to taste
Start by peeling the potatos. Next, use a box grater to shred the potatos. Place the shredded potatos in a collander over the sink and with your hands, grab a handful of potatos and squeeze out the liquid. Repeat until you've put the squeeze on all of the shredded potato. Then, wrap the potatos in a paper towel and give it one more squeeze. This should remove any liquid on the surface of the potatos. Preheat your cast iron skillet over medium heat (you can use a regular fry pan, but cast iron's the best). Add vegetable oil to coat the bottom of the pan. Dump the potatos into the skillet and spread them out to form an even layer and give it a shake to make sure nothing sticks. Add salt and pepper. Then don't mess with it for the next 2 minutes, otherwise the crust wont form. After two minutes, lift the edge to see how your crust if forming. Wait until you get a nice crunch, then start flipping. You don't need to flip the whole thing at once, just do what you can. Now you'll have to add some more oil (almost as much as what you started with) and give it another shake to prevent sticking. I try to keep the oil addition to a minimum. I'll add a little oil to any place that looks dry and likely to burn. Once this side is browned, you can plate and serve.
I personally like to eat mine with ketchup and Cholula hot sauce. To lighten it up, you can add some chopped green onions or chives at the end and serve it with some sauteed tomatoes. To make corned beef hash, just add the corned beef and chopped onions with the potatos and everything should come out fine.
Sunday, October 04, 2009
French Chicken in a Pot
This is a great simple recipe that I saw on America's Test Kitchen.
I simplified their version even more and the taste is still unbelievable.
I only have a 3.5 qt Le Crueset dutch oven but I still wanted to do this recipe
Serves 4
1 whole roasting chicken (4 1/2 to 5 pounds), giblets removed and discarded
1 tablespoon table salt
1 teaspoon ground black pepper
1 tablespoon vegetable oil
1 small onion , chopped medium (about 1/2 cup)
6 medium garlic cloves , peeled and crushed
1 bay leaf
1 teaspoon dryed rosemary
Preheat oven to 250 degrees F.
Combine salt and pepper in a small bowl (this will be the dry rub).
Rinse the chicken and pat as dry as possible with paper towels.
Sprinkle the salt and pepper mixture all over the chicken making sure to add some to the cavity.
Heat oil in the dutch oven over medium heat. Brown the breast side of the chicken for about 5-8 minutes. Meanwhile dice the onion and add it to the dutch oven. Add garlic, rosemary, and the bay leaf. After the breast side has browned nicely, flip the bird and brown the bottom side for another 5-8 minutes. Finally, cover the dutch oven with aluminum foil and place the lid on that to ensure a good seal. Place in the oven for approx 1-1.5 hrs until desired tenderness.
Once cooked, you will see lots of liquid released by the cooking process. Remove dutch oven from oven, remove the chicken, set it aside, and cover loosely with foil. Strain the liquid from the dutch oven through a strainer and skip off the fat. Add any drippings that have come off the resting chicken to the strained liquid or jus. At this point you can season the jus to taste and serve with the chicken.
Update: If you have a convection oven with some sort of "speed bake" technology, then its better to set the temp to 225F and use that feature. I also increased the salt content to a full tablespoon. I found that a bit extra salt helped to bring out the flavors even more.
Sunday, November 30, 2008
My Oven Baked BBQ Spare Ribs Recipe
I grew up in Memphis, Tennessee, BBQ capitol of the world (at least that's what we say) and having great BBQ joints around every corner meant that we didn't have to spend hours perfecting our own BBQ. Now that I've moved out the Bay Area, I'm struggling to find something even remotely as good as the stuff you get at the fast food BBQ joints back in Memphis.
The folks out here still don't know the difference between grilling and BBQ'ing. Grilling is when you expose the food to direct flames with the intent on searing the meat. BBQ is all about cooking "low and slow" and smoke. That is, using indirect heat to gently tenderize the meat while imbuing it with a pink ring of smoky flavor. In scientific terms, the low heat breaks down the connective tissue in the meat, turning it into collagen and other molecules that are much easier to bite through.
When I looked for oven baked BBQ recipes on the net, I mostly found recipes that asked you to cook the ribs at up to 350 degrees for around 1-2 hours. This is not "low and slow" and when I tried these recipes, my ribs came out much tougher than I expected. On top of that, the smaller pieces were overcooked, the bigger pieces still raw, and everything was pretty dry.
After more extensive research, I pulled together several techniques I got from various places and have created the best oven baked ribs I've ever had. The recipe is interesting because, it is one of the few that relies very little on the quality of the ingredients and is almost entirely the result of using the right techniques. Therefore, my ingredient list will be fairly generic, and I'll focus on the techniques that matter.
Ingredients:
2 racks of spare ribs
1/4 cup Apple Cider Vinegar*
1/4 cup your favorite BBQ dry rub*
1 cup your favorite BBQ sauce*
1 can beer or water
* No need to measure, just use enough to coat the ribs.
Instructions:
First remove the silver membrane on the back of the ribs. Starting from the smallest rib, use a knife to separate the membrane from the flesh. Once you separate it from the first bone, you should be able to pull it all off the whole rack like a piece of tape. Use a paper towel if you're having trouble getting a grip on it. Why? The tough membrane will stick in your teeth and also prevent the dry rub seasoning from penetrating the meat.
Next, place the ribs on a large cooling rack inside a large sheet pan. Pat the ribs dry with paper towels and coat the ribs with the apple cider vinegar. Why? The vinegar will open up the pores of the meat allowing the dry rub seasoning to penetrate.
Coat and rub the ribs with a generous amount of your favorite BBQ dry rub. Knock off the excess. I use a mix of brown sugar, paprika, black pepper, celery salt, mustard, and garlic powder. You can make your own or use a store bought brand.
Then loosely tent a sheet of aluminum foil over the ribs and place the baking sheet full of ribs into a 250 degree oven. Pour the beer onto the baking sheet, under the cooling rack keeping the level just below contact with the ribs. Why? The foil, keeps the moisture around the meat while the beer steam bath ensures that our ribs never dry out.
Bake for around 4 hours or until the ribs are easy to bend but before they can easily break in two. If you are able to put a whole can of beer in the pan, you probably won't need to add any more during the process. If your cooling racks are shallow, you may have to add more beer as it dries out.
Once you're close to the desired tenderness, remove and uncover the ribs and turn on the broiler. Brush on a thin, uniform layer of BBQ sauce (I use Bulls-Eye) and stick it back into the oven. After a few minutes the sauce should bubble and eventually darken and burn just a little around the edges. This is caramelization and its a good thing. Take the ribs out again, brush on another layer, and stick it back in until the sauce caramelizes again (you can repeat this as much as you like, but I find once or twice to be enough). Why? Heating sauce to a high temp causes the sugars to develop a "caramelly" flavor and become sticky. The heat also dries up all the moisture in the sauce giving you a layer with a nice "bite" next to the tender meat.
When you've achieved your desired BBQ sauce coat, take the ribs out, replace the foil tent, and allow them to rest for at least 5 minutes before cutting. Why? As with all meats, rest after cooking reduces the juices we worked so hard to keep from oozing out of the cuts.
Saturday, May 17, 2008
Awase Miso Soup Recipe
 I can't take full credit for this since, its mostly wife's recipe, but hopefully I can show you some techniques to make a real awase miso shiru otherwise known as blended (red & white) miso soup.
Ingredients (1 serving size):
 1 heaping Tbsp awase miso paste
1/2 green onion sprig
1/3 pkg soft or silken tofu
1 cup dashi (recipe below)
Red miso is a specialty in my wife's hometown of Nagoya, Japan. It has a much deeper more salty flavor than the more common shiro miso or white miso which is a little sweeter. If you blend them together, you get the best of both worlds. Luckily, the Japanese have already thought of this and sells a blended version known as awase miso. Of course if you can't find it at your local asian food market, you can always buy them separately and mix them yourself. Don't worry, this stuff is packed with salt so it will practically last forever.
Red miso is a specialty in my wife's hometown of Nagoya, Japan. It has a much deeper more salty flavor than the more common shiro miso or white miso which is a little sweeter. If you blend them together, you get the best of both worlds. Luckily, the Japanese have already thought of this and sells a blended version known as awase miso. Of course if you can't find it at your local asian food market, you can always buy them separately and mix them yourself. Don't worry, this stuff is packed with salt so it will practically last forever.
 Dashi is another major component of this and almost all other Japanese soups. Dashi is a broth made from either fish or a type of seaweed known as konbu.
  Typically, it is made bonito flakes, which are the shavings of a dried fish that you can buy at most asian food stores. To make it, you bring water close to a boil, add a bunch of flakes, let it steep for a few minutes then scoop out the flakes. We like the taste of bonito flakes, but its a pain to scoop them out so we buy bonito flakes prepackaged in tea bags (see photo on the left). Just like when making dashi with just the flakes, you should bring the water up to just before boiling before adding the
  bonito package. You must also keep the water from boiling while you steep the bonito flakes. If you let the water boil, the dashi will become bitter. Once your dashi gets a nice golden color and you can smell the ocean in it, you can remove the package and your dashi is done! You can also make a larger amount than needed and freeze the leftover dashi in a plastic container. My wife likes to freeze it in ice cube trays, but I think that will just make the rest of the food in the fridge smell fishy, hehe.
 Once you have good dashi the rest is easy. Simply dissolve the red miso paste into the dashi. I find it helpful to use two spoons to smash the miso while submerged in the dashi. Its okay for there to be some bits that don't seem to dissolve. You must taste the soup as you are adding miso to ensure you have the right amount of saltiness. You will want it to be a little extra salty to compensate for the bland tofu you will be adding. Next dice your tofu into quarter inch size cubes and add them to the soup. Be sure to keep the soup from boiling after adding tofu or else your tofu will get tougher. Then serve in a miso soup bowl (something my wife requires), but if you don't have one, any bowl you don't mind sipping directly from will do. Finally, garnish with the finely chopped green onion.
 Hope you enjoy it.
Wednesday, May 07, 2008
Super Quick Chicken Arrabbiata Recipe

While my wife is away visiting family in Japan, I've had to go back to my bachelor days of preparing quick meals for myself. As a foodie, I needed something more gourmet than a tv dinner so I'll share one of my secrets to an easy gourmet meal in just a few minutes. The key to this recipe is Trader Joe's pre-packaged and frozen pastas. You can just heat it in a saucepan and serve. By not having to boil water to cook dry and making sauce from scratch, you save lots of time. If you don't have a Trader Joes in your area, just find any frozen pasta that you like and use a single serving portion of it.
Prep/Cook Time: 15 minutes
Servings: 1 (multiply ingredients by the number of servings)
Ingredients:
1 breast from a Rotisserie Chicken (Costco)
1/2 pkg Trader Joes Arrabbiata Pasta
1/2 stalk of green onion (chopped)
1/2 bell pepper (sliced)
pecorino romano cheese to taste (Trader Joes, grated at home)
1 Tbls vegetable oil
Heat oil in a saucepan over medium heat. While waiting, slice bell peppers (cut to the size of the pasta noodles) and add to the pan. While that cooks, dice chicken breast into bite sized pieces and add to pan. Cook until chicken is completely heated through. Add frozen pasta and a few tablespoons of water. Cook until all pasta sauce is completely melted. Add more water if the sauce seems too thick. Right before plating, add half the green onions and give the pasta a stir. After plating, grate pecorino cheese and sprinkle the rest of the green onion on top as garnish.
Enjoy!
Variations:
Zucchini and/or squash cut into sticks can be added with or instead of the bell peppers. Just keep the total quantity of vegetables relatively the same. Also good is quartered artichoke hearts which you can find canned or jarred. Instead of chicken, you can try canned tuna in oil (not water). Be sure to drain the oil from the tuna. For garnish, you can use parsley or Italian flat-leaf parsley, but reduce the amount you use. In general, this is a good dish for using up any vegetables you may have.
FYI, that really is a picture of this dish.
Monday, November 13, 2006
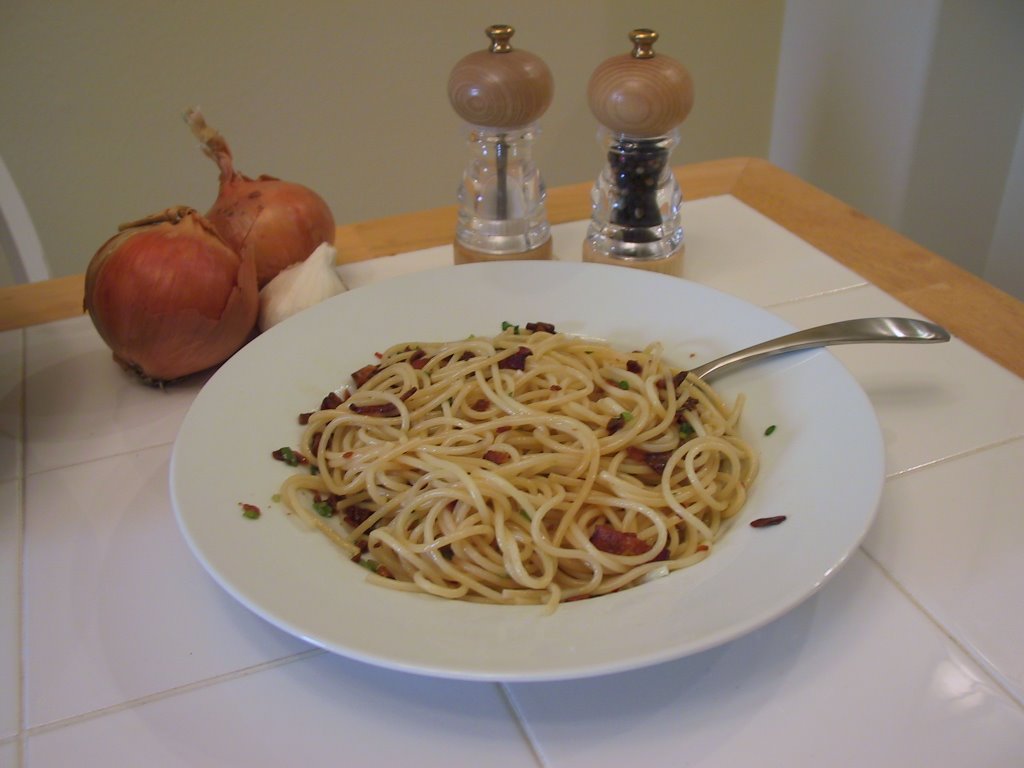
The Perfect Garlic oil Pepperoncino Spaghetti Recipe
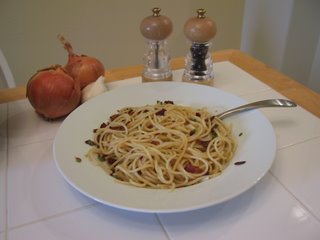 I found out about this dish when I was at my friend's place. His fiance had boiled up some spaghetti noodles, but there was nothing else that even resembled a sauce. Strangely enough, she pulled out some packets of seasonings and oils (like the kind you get with instant ramen noodles) and proceeded to dump them on the cooked noodles and just like that, the dish was done. Note: the correct name for this dish is "Aglio Olio Peperoncino". The Japanese call this Peperoncino Spaghetti even though the peppers (peperoncino) make up only a minute amount of the whole seasoning payload.
It wasn't bad, I could definitly taste the garlic in there, but I felt that the flavors weren't strong enough. I guess that's what you can expect from a packet that's been sitting on the store shelf for a while. Anyhow, I decided it was time to make my own version, with fresh ingredients and a lot more flavor.
Ingredients: (1 serving)
4 cloves of garlic, minced
125 grams dry spaghetti pasta
3 Tbsp Extra Virgin Olive Oil
1/4 tsp Hot Chili flake
2 slices of bacon
1/2 onion, chopped
1 pinch finely chopped parsley (optional)
salt and pepper to taste
Bring a couple quarts of water to boil in a large pot. When its reached full boil, Add salt to boiling water until it becomes salty, then add your pasta. Meanwhile, cut up the bacon into bit sized pieces and fry in a skillet. In a separate pan, lightly fry the minced garlic and olive oil over low heat until golden brown. Season with two pinches of salt. Add chili flakes one minute before the garlic is done. Be careful not to overcook the garlic! If it becomes brown and bitter, its overcooked. When the bacon is done, drain them on a paper towel. Remove all the fat from the pan except for a tablespoon and saute the chopped onions until sweet and translucent. Season with salt & pepper. When the pasta is al' dente, drain and add it to the pan with the chopped onions. Toss with the bacon and fried garlic and oil and serve. Garnish with chopped parsley and ground pepper.
Subscribe to:
Posts (Atom)