I have tried using Naval Jelly for rust removal and never liked the staining that occurs. If you miss a spot during application, you'll clearly see the outline of the stain. Successive coats won't hide it. The only way to remove them is to sand away the stain. A friend of mine had great success using electrolysis to remove rust from an old gun so I thought I would give that a try.
Electrolysis rust removal is essentially the process of using electricity and an electrolyte to move the rust from the part being cleaned to a sacrificial electrode. There's a bit more going on there, but you get the picture.
The first step then, is to provide the electricity. Pretty much any DC current will do so long as you have some sort of protection for short circuits. Most people use a 12v car battery charger/starter since they are cheap and most people have one. It should be able to charge at rate of a couple amps. The trickle chargers won't work. I unfortunately don't have one, but I do have an old computer power supply. A PC power supply (PSU) is basically a regulated AC to DC converter that provides multiple voltages ("rails"). The only difficulty is that turning on a PSU requires you to jump a wire (short 2 wires together) and ensure there is a load on the 5volt rail.
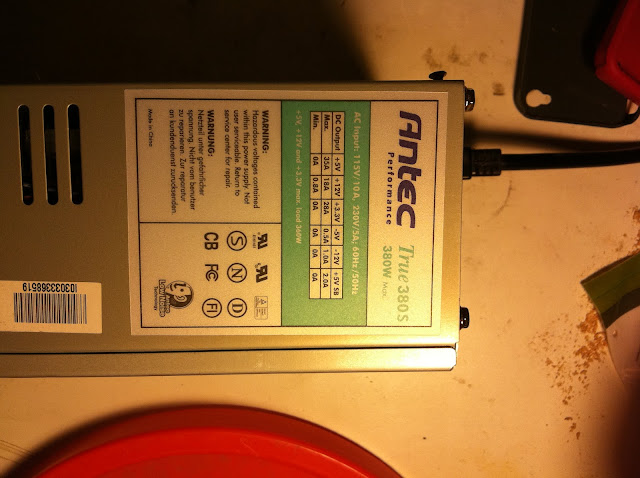
On any PSU, there should be a nameplate which gives you the number of amps each rail can produce. Here you can see the +12V rail can produce a good 18 amps! That will be more than enough for our needs
My goals:
- Add a switch so I don't have to jump wires to start this thing
- Add binding posts to make connecting wires easier
- Add a fuse to protect the PSU in case I cause a short circuit
- Add resistors to stabilize the voltage
Here is a view w/ the cover removed. As you can see there's not much room for me to add anything.
One thing to note, is that based on what I saw, the PSU is laid out so that the high voltage AC work is done on one side (top in the pic above) and the lower voltage DC work is on the other. Since I'm adding wires and components for DC, I'll want to stay towards the DC side as much as possible.
I don't need no stinking wires! Well, actually I do. These wires are color coded. The green wire will power on the PSU if I connect it to one of the black wires. The yellow, red, and orange wires represent the +12V, +5V, and +3.3V rails respectively. The black wires are all ground. I removed all the wires except the yellow, black, green, one red, and a pair of wires for an extra fan. Of the colors I did keep, I still had too many wires so I thinned them down so I would have more room in the case.
To stabilize the voltages, I needed to put a load on the +5V rail (red wires). I used 2 20Ohm 5 watt resistors wired in parallel. This gives me effectively a Since they would get hot dissipating that power, I zip-tied them to the case grill.
Here's a look from the inside. Notice I used shrink wrap tubing to minimized the exposed metal. Hopefully nothing will short out.
Here you can see that I added battery clamps.Again remember to thread the clamp handles onto the wire before attaching them otherwise you wont be able to get them back on.


No comments:
Post a Comment