I fear this puts a precendent on state governments to impose what are essentially illegal laws for taxation, because in the end they will get what they want. Although I'm glad to get my affiliate status back, I feel a little dissappointed that Amazon gave in so quickly.
Monday, October 03, 2011
I'm Re-instated!
I fear this puts a precendent on state governments to impose what are essentially illegal laws for taxation, because in the end they will get what they want. Although I'm glad to get my affiliate status back, I feel a little dissappointed that Amazon gave in so quickly.
Saturday, September 24, 2011
Garage Sale Handplanes #2: PSU Mod for Electrolysis
This is Part 2 of my previous post Garage Sale Handplanes
I have tried using Naval Jelly for rust removal and never liked the staining that occurs. If you miss a spot during application, you'll clearly see the outline of the stain. Successive coats won't hide it. The only way to remove them is to sand away the stain. A friend of mine had great success using electrolysis to remove rust from an old gun so I thought I would give that a try.
Electrolysis rust removal is essentially the process of using electricity and an electrolyte to move the rust from the part being cleaned to a sacrificial electrode. There's a bit more going on there, but you get the picture.
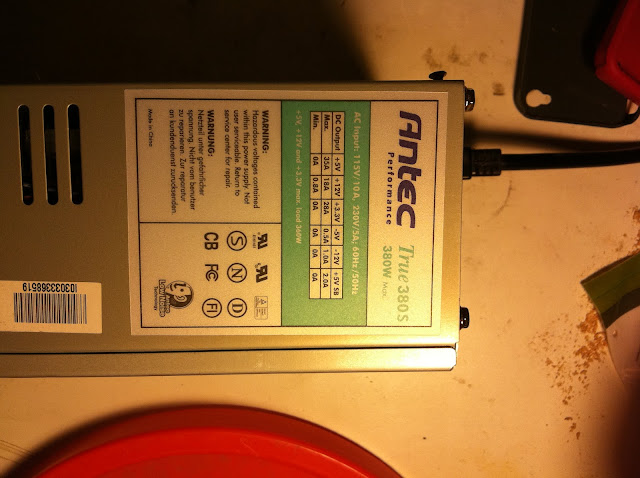
The first step then, is to provide the electricity. Pretty much any DC current will do so long as you have some sort of protection for short circuits. Most people use a 12v car battery charger/starter since they are cheap and most people have one. It should be able to charge at rate of a couple amps. The trickle chargers won't work. I unfortunately don't have one, but I do have an old computer power supply. A PC power supply (PSU) is basically a regulated AC to DC converter that provides multiple voltages ("rails"). The only difficulty is that turning on a PSU requires you to jump a wire (short 2 wires together) and ensure there is a load on the 5volt rail.
On any PSU, there should be a nameplate which gives you the number of amps each rail can produce. Here you can see the +12V rail can produce a good 18 amps! That will be more than enough for our needs
WARNING! DO NOT ATTEMPT THIS AT HOME. A PSU HAS HIGH VOLTAGE CAPACITORS THAT CAN KILL YOU.
My goals:
Here is a view w/ the cover removed. As you can see there's not much room for me to add anything.
 One thing to note, is that based on what I saw, the PSU is laid out so that the high voltage AC work is done on one side (top in the pic above) and the lower voltage DC work is on the other. Since I'm adding wires and components for DC, I'll want to stay towards the DC side as much as possible.
I don't need no stinking wires! Well, actually I do. These wires are color coded. The green wire will power on the PSU if I connect it to one of the black wires. The yellow, red, and orange wires represent the +12V, +5V, and +3.3V rails respectively. The black wires are all ground. I removed all the wires except the yellow, black, green, one red, and a pair of wires for an extra fan. Of the colors I did keep, I still had too many wires so I thinned them down so I would have more room in the case.

 Here you can see the binding posts for banana plugs and the switch installed on the case. The biggest pain was making a 1/2" hole for the switch. A stepped drill bit (the kind that looks like a cone) is what you want. I tried using a dewalt twist drill bit with a smaller "starter" bit at the tip. That failed miserably because the transition between the larger part of the bit would catch on the metal, bend it up and jam the whole kaboodle. The next major pain was my fault as you have to be aware of which nuts/sleeves need to be on which part of the wire before you solder. I ended up soldering the binding posts 3 times because of this.

Here's a look from the inside. Notice I used shrink wrap tubing to minimized the exposed metal. Hopefully nothing will short out.
 Here you can see that I added battery clamps.Again remember to thread the clamp handles onto the wire before attaching them otherwise you wont be able to get them back on.
 Here is the 15 amp inline fuse. The PSU probably has some sort of protection also, but these are cheap to install and fuses are cheap to replace.

I have tried using Naval Jelly for rust removal and never liked the staining that occurs. If you miss a spot during application, you'll clearly see the outline of the stain. Successive coats won't hide it. The only way to remove them is to sand away the stain. A friend of mine had great success using electrolysis to remove rust from an old gun so I thought I would give that a try.
Electrolysis rust removal is essentially the process of using electricity and an electrolyte to move the rust from the part being cleaned to a sacrificial electrode. There's a bit more going on there, but you get the picture.
The first step then, is to provide the electricity. Pretty much any DC current will do so long as you have some sort of protection for short circuits. Most people use a 12v car battery charger/starter since they are cheap and most people have one. It should be able to charge at rate of a couple amps. The trickle chargers won't work. I unfortunately don't have one, but I do have an old computer power supply. A PC power supply (PSU) is basically a regulated AC to DC converter that provides multiple voltages ("rails"). The only difficulty is that turning on a PSU requires you to jump a wire (short 2 wires together) and ensure there is a load on the 5volt rail.
On any PSU, there should be a nameplate which gives you the number of amps each rail can produce. Here you can see the +12V rail can produce a good 18 amps! That will be more than enough for our needs

My goals:
- Add a switch so I don't have to jump wires to start this thing
- Add binding posts to make connecting wires easier
- Add a fuse to protect the PSU in case I cause a short circuit
- Add resistors to stabilize the voltage
Here is a view w/ the cover removed. As you can see there's not much room for me to add anything.

I don't need no stinking wires! Well, actually I do. These wires are color coded. The green wire will power on the PSU if I connect it to one of the black wires. The yellow, red, and orange wires represent the +12V, +5V, and +3.3V rails respectively. The black wires are all ground. I removed all the wires except the yellow, black, green, one red, and a pair of wires for an extra fan. Of the colors I did keep, I still had too many wires so I thinned them down so I would have more room in the case.

To stabilize the voltages, I needed to put a load on the +5V rail (red wires). I used 2 20Ohm 5 watt resistors wired in parallel. This gives me effectively a Since they would get hot dissipating that power, I zip-tied them to the case grill.


Here's a look from the inside. Notice I used shrink wrap tubing to minimized the exposed metal. Hopefully nothing will short out.


Friday, September 23, 2011
Taking down my tree

Monday, September 19, 2011
Graph Databases + Hadoop?
When one thinks of BigData processing, many people immediately think of Hadoop. And if you want to put a database on Hadoop, you think of HBase. However, with the glut of loosely structured data coming from all over the web, the most useful type of database is a Graph Database. Unfortunately, there is currently no graph DB on hadoop and I'm not sure if there ever will be one.
What is a Graph?

It is merely a way of structuring data using vertices (or nodes) and edges. Data is stored both at the vertices and on the edges themselves. Edges can be bi or uni directional. The flexibility comes from the fact that any edge and point to any node and many times, the information that we seek is related to the configuration of the graph, not just the data in the edges and nodes. In the graph above, we can see that Alice and Bob are both members of the Chess group and that they both know each other.
In the example, we use nouns as nodes and the verbs: knows, and is member as edges. This is a very common way of modeling natural language statements as graphs. Let's take a look at some fake tweets that I have contrived for an example:
@NikeFan - I love my Nike's. They are the best shoes.
@ShoeShopper - I just bought some Nikes, some Reeboks, and a Swiss Air.
@ReebokFan - I just hate Nike, their new lineup is horrible.
After some text analysis we could derive this graph:

What is a Graph?
It is merely a way of structuring data using vertices (or nodes) and edges. Data is stored both at the vertices and on the edges themselves. Edges can be bi or uni directional. The flexibility comes from the fact that any edge and point to any node and many times, the information that we seek is related to the configuration of the graph, not just the data in the edges and nodes. In the graph above, we can see that Alice and Bob are both members of the Chess group and that they both know each other.
In the example, we use nouns as nodes and the verbs: knows, and is member as edges. This is a very common way of modeling natural language statements as graphs. Let's take a look at some fake tweets that I have contrived for an example:
@NikeFan - I love my Nike's. They are the best shoes.
@ShoeShopper - I just bought some Nikes, some Reeboks, and a Swiss Air.
@ReebokFan - I just hate Nike, their new lineup is horrible.
After some text analysis we could derive this graph:

As you can see, the edge "is" can be applied to either Shoe or Twitter users. This makes the graph easily extended as our knowledge increases. You can also see that if I want to find twitter users who have bought shoes, I would look for any node that "is" a shoe and see what nodes "bought" it while ensuring that node "is" also a Twitter User. This is where the graph database comes in. These types of databases are optimized for searching and traversing over relationships to resolve your queries. A traditional RDBMS could represent a graph as just a few tables, however resolving a graph query would take ages as each step in the search would involve scanning the same set of tables over and over. Then as your graph grows, your query times grow linearly or worse. With a graphing DB, there are many opportunities to limit where we search and enable the search to be done in parallel.
The Holy Grail - Graphing Databases on Hadoop
You would think that with all the power Hadoop provides, there should be at least one graph db on it, but at this time there are none. I think there are valid technical reasons for it. For one, Hadoop has a high latency. Even a one second response time would be unreasonable for simple queries and I doubt any hadoop job could be resolved in less than one sec. Part of the reason is that the inputs and outputs of a map reduce job are files and the underlying hadoop file system (HDFS) will log, replicate, and checkpoint the data to hard disk as the job runs. If we had a sort of Hadoop Lite system where we keep our partial data results only in memory, then we could reduce some of the latency. If a node fails, then we simply restart the computation from the point where we have data on disk, maybe even distributing that across the nodes that have already finished. The second issue is hadoop doesn't like the data elements that you process to be dependent on each other. With a graph query, that is very hard to do. Even if you could partition each node with disconnected graphs, they can still be easily connected in the future necessitating a costly reshuffle of the data. Worse yet, is that in time, graphs tend to be more connected, so eventually you'll have only one partition, not a very scalable option. The only solution I can come up is to allow the graphs to traverse nodes and when a query hits a border between machines, issue a new query that is fed back into another map reduce round. This continues until a solution is found. This means that if you have a solution that traverses through multiple machines, you would have to run multiple rounds of map reduce making the query super slow.
In the end, I expect we'll have to settle for a different platform other than hadoop to support graphing databases. We could still use hadoop to do inserts or query into a graph database, but as far as running the db on hadoop, that's not gonna happen in the foreseeable future.
Friday, September 16, 2011
Hadoop for Everyone
One of the major pain-points of hadoop, is the fact that not all machines are treated the same. Some machines have to function in roles like NameNodes which require large amounts of RAM and some level of high availability/redundancy. On the other hand, the vast majority of machines can function as workers and can be simple commodity machines for cost savings. This means any efficient hadoop cluster is going to be a heterogeneous environment which further increases maintenance costs.
So what can we do? What we need is an on-demand hadoop cluster that you can pay for what you use. Amazon's EC2 and S3 have typically been used to provide metered webservices and data storage. However, deploying a hadoop cluster with heterogeneous server instances on a remote cloud still requires you to do a lot of the setup. Amazon realized this and created their Elastic MapReduce service. Now you can run your hadoop jobs on-demand with very little configuration and yet still have complete control over what class of machine you want to assign to the different roles in your cluster.
This makes a lot of sense for software developers like me. During development, I may use a small cluster to prove that my stuff is working. During QA, we might vary the size/configuration to see how our solution scales and do performance tuning. Our marketing and sales teams can have demos ready on the cloud anytime, anywhere in the world to showcase prospective customers. We would also have a good solution for customers who do not want a huge IT spending outlay before they are convinced of the value of our product. This might even absolve us of any legal/privacy concerns by letting the customer make their own agreements with Amazon whereas we provide just the software.
Wednesday, September 14, 2011
Dear Sophie, sorry it's just too difficult
If you haven't seen the Google Chrome ad "Dear Sophie" you should see it below.
Being a dad, especially one with a daughter named Sophie, you can't help but feel the need to recreate this experience for your own children. Unfortunately, I found that trying to replicate this was much less heart-warming than the ad would suggest. For starters, Google doesn't allow you to create gmail accounts for other users. If you enter a child's birthday and they are less than 13 it will stop you also. Next suppose you forget to login to the gmail account for a few months, guess what, it just might be deleted. My issue was that since I never had a gmail account attached to my google account (yes they are separate things) and as soon as I tried to create a gmail address for my daughter, that address becomes permanently attached to my google account. Even if you delete the gmail account, I would never be able to assign my gmail account to it. Furthermore, my daughter would never be able to have her email address as it is permanently taken by my account. Of course I didn't want to simply give her my account which has access to all the other google services like this blog/adsense/analytics/picassa/youtube. My only recourse was to create a new google account for myself, transfer every google asset I have to that account, delete my old account, and try to recover it from google (supposedly recovering an account only recovers the username, my daughters new email address, but everything else is wiped clean). Now google is refusing to recover the account. Apparently, they are not sure if I am the owner of the account, despite the fact that I'm the one who deleted it. So now I'm stuck. My daughter won't have her email address. All this because google can't bring themselves to change gmail accounts on their google account.
I say screw it all and just create a private blog by limiting the permission of the readers. This eliminates the need to keep logging into your children's email accounts to keep it around. Since its private you can share it with them and only them just as any email account.
I say screw it all and just create a private blog by limiting the permission of the readers. This eliminates the need to keep logging into your children's email accounts to keep it around. Since its private you can share it with them and only them just as any email account.
Saturday, September 10, 2011
Garage Sale Hand Planes
I got these on my last outing. I had just about given up hope when I saw one more yard sale sign on my way home. I managed to negotiate them down to $60. Its a Stanley #7C and #5C. The tote is broken on the 5, and the lip on the 7 also looks broken off. I'll do a blog on restoring these once I can get some of my other projects squared away.


Tuesday, June 21, 2011
French Baguette (Round 2)
This time I took a friend's advise and made a wetter "slack" dough and tried a technique called "autolyse". I'd say it definitely turned out better, but I'm still not getting the same crust or texture you normally associate with a high quality baguette. My crust is crispy but thin and delicate, and the interior has a nice chewiness but is borderline spongy and a little lacking in flavor.
For this round, decided to go with 75% hydration which is what I saw some french bakers using for their baguettes. That means 75% water to flour ratio by weight. So for my 12.6 oz of flour I need 9.5 oz of water. This high level of hydration means you have a very loose "slack" dough that wants to stick to everything. The trick with handling this dough is to use dry flour to keep it from sticking to everything, but avoid mixing it into the dough thereby reducing the hydration level.
Next, I wanted to try a technique called autolyse which means that you mix together just the water and flour and let it sit so that the enzymes in the flour have a chance to break down the proteins that you can later form into gluten, the building block of bread. Usually you form gluten during the kneading process which mechanically breaks down the proteins so they can be reformed into gluten. With autolyse, you let the enzymes do half the work for you.
To make this work with the bread machine, I had to hand mix the flour and water first. Once it comes together, put it into the bread machine work bowl. Then make a little crater to pour the yeast in and sprinkle the salt around the edges away from the yeast. I waited 10 minutes before starting the dough cycle, as it normally starts with a 20 min rest cycle so combined, I have about 30 minutes of autolyse. The rest is pretty much the same as in my previous recipe.
Here are the results:


Friday, June 17, 2011
French Baguette Recipe (Work in progress)
This is a recipe I'm still trying to perfect, but I'm tired of keeping this scrap piece of paper with my recipe on it.
This is going to be a half bread machine, half hand made baguette. I'm using a 1lb Zojiroshi bread maker that my wife likes because it doesn't take up much space however being only 1 lb this recipe may seem small for most people.
Ingredients
12.6 oz Bread Flour
1 cup water
1 teaspoon salt
1 teaspoon yeast
Instructions:
1) Add the ingredients to your bread machine like you normally would and use the dough setting.
2) When done, divide the dough into thirds by weight.
3) Roll each third into a tight ball on a lightly floured surface.
4) Form the baguettes and place on a lightly floured baking sheet.
5) Cover and let rest for 60-90 minutes.
6) Heat oven to 500 degrees, with an empty sheet pan in the bottom rack.
7) Right before baking, make diagonal cuts in the dough for expansion and spritz all over with water.
8) Dump a half cup of water into the empty sheet pan to make steam and bake the baguettes for 15-20 minutes at 425 degrees until the tops get golden brown.
9) Remove the empty sheet pan after they start turning brown.
10) Once tops start turning brown, move the baguettes from the baking sheet and place them upside down onto the oven rack so the sides can brown, about 5 mins.
11) Remove from oven and allow it to cool a few minutes before eating.
Wednesday, May 04, 2011
Ridgid 14in Bandsaw Restoration & Upgrade Part 4
Urethane Bandsaw Tires
Nothing too exciting here. Just had to soak them in hot water as the mfg suggested so I could stretch them over the wheels.
Motor Rehab
I got the key stock and pulley from Grainger today. The shaft of the motor was just a smidge too large for the bore of the pulley so I tensioned some sandpaper around the shaft with the motor running and that made a perfect fit.
As I turned the motor shaft by hand, I could hear light metal on metal contact so I decided to take the motor apart to investigate. As I was taking it apart I think I may have broken the plastic centrifugal switch contact plate... Oops! I then tried to track down a replacement switch, even calling an electric motor repair shop. The shop said, they stopped making parts for this motor, but I could buy another used and discontinued one for only $470! Sorry, but no. I ended up epoxying a large washer to the remaining piece of the contact plate (Washer cost=$0.40). I had to buy a gear puller to get the bearing off the shaft. This puts a little bit more pressure on the contact switches, but I think it should be fine. I can hear the switch return back to the start position after the motor shuts off. Unfortunately the metal on metal sound is still there... Oh well. I'll take some more pics when I get the motor mounted.
Friday, April 29, 2011
Ridgid 14in Bandsaw Restoration & Upgrade Part 3
Motor Update
Got my motor today. I found the seller on Craigslist, but since he lives on the opposite side of town (about an hour away). Luckily, my coworker lives near him so had him pick it up for me and then bring it to work the next day.
 At 1.5HP this should double the 3/4 horses of the stock motor. It can be wired for 115/230. Does anyone know if wiring it for 230 makes it run any better?
I tried to reuse the pulley (sheave) and key from the old motor but I think Ridgid used some kind of non-nema standard motor which doesn't fit. I had to order key stock and a new pulley from Grainger. I'll update my cost list in part 1.
Balancing the Wheels
Got my motor today. I found the seller on Craigslist, but since he lives on the opposite side of town (about an hour away). Luckily, my coworker lives near him so had him pick it up for me and then bring it to work the next day.
I tried to reuse the pulley (sheave) and key from the old motor but I think Ridgid used some kind of non-nema standard motor which doesn't fit. I had to order key stock and a new pulley from Grainger. I'll update my cost list in part 1.
Balancing the Wheels
The top wheel seems moderately unbalanced. There are drill marks on the side that is now too light. I'm not sure if they went too far or if they were just lightening the wrong side of the wheel. | |
I first tried to balance the wheels using coins and Gorilla tape... probably not a good long term solution. I also didn't like the idea of epoxying coins on the wheel either. Instead, I found these peel and stick automotive wheel weights. You can cut the amount you want with a pair of tin snips. I used my kitchen scale to weigh the coins used previously and simply cut enough lead to equal that weight. | |
I ended up needing a sliver more of weight. The double-sided tape seemed plenty strong for this. This is only the top wheel. I managed to remove the bottom wheel after finding out that the bolt holding it on was a counter-clockwise thread. The bottom axle doesn't spin as freely as the top so I can't tell if the bottom wheel is out of balance. If anyone knows how to remove the bottom axle so I can inspect/replace the bearings, that would definitely help. I guess I should have put on the urethane tires before trying to balance these. I'll just have to check the balance again once I replace them. |
Thursday, April 28, 2011
Ridgid 14in Bandsaw Restoration & Upgrade Part 2
Installing the Riser Block
I managed to get the riser block kit installed by myself without much trouble.
I used my HF 1 ton chain hoist to hold the upper part while I removed the large bolt holding it together.
 You have to make sure to support both sides of the upper assembly or else it will tip over as soon as you remove the bolt (which I found out the hard way).
Even though this was a Grizzly riser block, it fit perfectly on this Ridgid. You can buy the Ridgid version, but it costs like $170 which is a bit ridiculous to me. It looks like everybody has made direct copies of these 14" saws so the parts are pretty much interchangeable. Heck, if you want roller guide bearings, you just have to order the parts from Grizzly and install them.
One thing in the instructions that wasn't mentioned is that to install extended bar that holds the guide assembly, you need to take care not to lose the spring and steel ball that keeps the bar from falling out when you loosen the knob. As I pulled the bar out, this shot out. That fact that I still managed to find it in my mess of a workshop still baffles me.
The blade guard in the kit appeared to be bent at the end where the screw slots were. A bit of finagling and bending got it back in shape so that it could be attached to the guide assembly. Here's what the extension looks like installed.

Cleaning Up the Cast Iron Top
 The top had a couple splotches of brown glue (at least I hope its glue) that I was able to scrape off with a putty knife. To get rid of the rust, I used a bunch of wet/dry sandpaper that I got from Harbor Freight. I have to say that the HF paper is horrible. All the grit seemed to come almost immediately off and the resulting slurry barely scratches the cast iron. Maybe it was my technique of using WD40 as a lubricant. I managed to get it to look like this with about 2 hour's worth of hard work. This prompted my purchase of Mirka wet/dry paper (to qualify for free shipping) for when I get back to the planer project. I then used mineral spirits to clean off the residue. Next I put on 3 coats of SC Johnson's Paste Wax, letting it dry and buffing between each coat.
Removing the bottom axle
I can't seem to remove the bottom axle. I managed to take off the wheel, pulley, and e-clip, but any attempt to bang the shaft either toward the wheel side or toward the pulley side was futile. If anyone knows how to remove this, I would be greatly thankful.
I managed to get the riser block kit installed by myself without much trouble.
I used my HF 1 ton chain hoist to hold the upper part while I removed the large bolt holding it together.
Even though this was a Grizzly riser block, it fit perfectly on this Ridgid. You can buy the Ridgid version, but it costs like $170 which is a bit ridiculous to me. It looks like everybody has made direct copies of these 14" saws so the parts are pretty much interchangeable. Heck, if you want roller guide bearings, you just have to order the parts from Grizzly and install them.
One thing in the instructions that wasn't mentioned is that to install extended bar that holds the guide assembly, you need to take care not to lose the spring and steel ball that keeps the bar from falling out when you loosen the knob. As I pulled the bar out, this shot out. That fact that I still managed to find it in my mess of a workshop still baffles me.
Cleaning Up the Cast Iron Top
Removing the bottom axle
I can't seem to remove the bottom axle. I managed to take off the wheel, pulley, and e-clip, but any attempt to bang the shaft either toward the wheel side or toward the pulley side was futile. If anyone knows how to remove this, I would be greatly thankful.
Wednesday, April 27, 2011
Ridgid 14in Bandsaw Restoration & Upgrade Part 1
Although I'm already working on my Makita 2040 Planer Restoration, I saw this on CL and just had to have it.
Its a Ridgid 14 in bandsaw with a Kreg fence that I got for $150.
 The Kreg fence alone is worth about $100 so I figure its a good deal. The previous owner was a penmaker and this thing was full of multi-colored dust. It has a lot of vibration at low rpm's (starting/stopping) but reduces dramatically at full speed although still noticeable.
After initial inspection, the table has some rust, the thrust bearings appear to be shot and some cool blocks and thumbscrews seem to be missing.
Plans:
So far I have spent the following:
My grand total so far is: $441.57. I still need to buy thumbscrews, bearings, and/or electrical tidbits to get it working.
Its a Ridgid 14 in bandsaw with a Kreg fence that I got for $150.
After initial inspection, the table has some rust, the thrust bearings appear to be shot and some cool blocks and thumbscrews seem to be missing.
Plans:
- Eliminating Vibration
- Replace the drive belt w/ a link belt
- Remove the rubber "anti-vibration" motor mounts and hard mount the motor
- Balance the wheels
- Increase Cut Capacity
- Install a riser block
- Upgrade the motor
- Fit and Finish
- Remove rust from table
- Replace worn out bearings
- Vacuum out the mountains of dust
So far I have spent the following:
| Grizzly | |
|---|---|
| H3051P Riser Block Kit | $69.95 |
| Shipping | $11.70 |
| ------------------------------------------------------ | |
| Total | $81.65 |
| Peachtree Woodworking | |
| 4' Fenner Power Twist V-belt | $25.90 |
| Urethane Bandsaw Tire | $29.50 |
| Shipping | Free |
| ------------------------------------------------------ | |
| Total | $55.40 |
| Highland Woodworking | |
| Cool Blocks | $12.99 |
| 1/2" x 105" Woodslicer Blade | $29.99 |
| Shipping | $8.99 |
| ------------------------------------------------------ | |
| Total | $51.97 |
| Craigslist | |
| Ridgid Bandsaw | $150.00 |
| 1.5HP 1725rpm Dayton Motor | $75.00 |
| ------------------------------------------------------ | |
| Total | $225.00 |
| Grainger | |
| Key Stock 3/16" x 3/16" | $1.24 |
| 5/8" bore 2.80" Diameter pulley | $16.00 |
| Tax & Shipping | $10.31 |
| ------------------------------------------------------ | |
| Total | $27.55 |
My grand total so far is: $441.57. I still need to buy thumbscrews, bearings, and/or electrical tidbits to get it working.
Subscribe to:
Posts (Atom)